Showing posts with label Our Generation. Show all posts

Tuesday, April 15, 2014

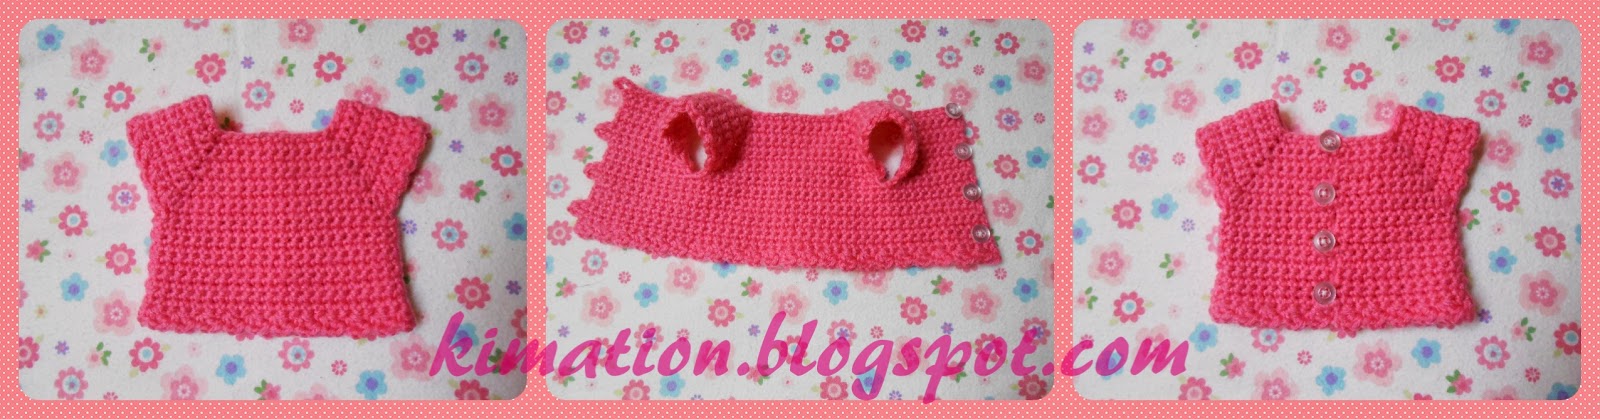
American Girl Simple Top


This simple top is quick and easy to work up. It's top down, one piece construction means only 2 ends to weave in. The pattern consists of alternating rows of sc and dc to give added texture. It's the American Girl version of my Journey Girl Simple Top


American Girl Simple Top
Written pattern copyright Kimberly Saunders 2014
Please do not reprint or repost this pattern, but please do link to this page to share with others.
Do not sell or reproduce this written pattern. If you sell anything made from this pattern, please give credit to me for the design 
and include a link to either the free pattern or my blog. Thank you!


Supplies:
Worsted Weight Yarn 
Crochet hook size H (5mm)
4   3/8 -5/8" buttons for back closure

Gauge:   Working in pattern: 9 sts = 2" and 6 rows = 2"
Special Stitches:
Starting Double Crochet: SDC = Pull chain to almost as high as a dc, yo and pull up a loop in the first stitch, yo and pull through one loop, yo and pull through 2 loops. Click HERE for a photo tutorial.

Notes:
*The top is worked from the top down, turning after every row.
*Work all sc in row 1 in the back ridge of the loop for a more finished look at the neck edge.
*I do not chain 1 at the beginnings of the sc rows. If you would like to, you can.
*Start the dc rows with the SDC. If you would rather do a ch 3, or other method, at the beginning of rows 2, 4, 6 and 8 you can.
*Either side can be the right side, depending on your preference. For a striped shirt, I prefer the dc rows to be right side.

Top:

Ch 37 + 4 for button loop. 

Row 1:  Sc in back ridge of 5th ch from hook, and in the back ridge of each ch across. Turn. (37 sc)

Row 2: Dc in next 5 sts, 3 dc in next st, dc in next 7 sts, 3 dc in next st, dc in next 9 sts, 3 dc in next st, dc in next 7 sts, 3 dc in next st, dc in next 5 sts. Turn. (45 dc)

Row 3: Sc in next 6 sts, 3 sc in next st, sc in next 9 sts, 3 sc in next st, sc in next 11 sts, 3 sc in next st, sc in next 9 sts, 3 sc in next st, sc in next 6 sts. Turn. (53 sc)

Row 4: Dc in next 7 sts, 3 dc in next st, dc in next 11 sts, 3 dc in next st, dc in next 13 sts, 3 dc in next st, dc in next 11 sts, dc in next 7 sts. Turn. (61 dc)

Row 5: Ch 4 for button loop and sc in each st across. Turn. (61 sc)

This next row will form the armholes.

Row 6: Dc in next 10 sts, skip 9 sts, dc in next 19 sts, skip 9 sts, dc in next 10 sts. Turn. (39 dc)

Row 7: Sc in each st across. Turn. (39 sc)

Row 8: Dc in each st across. Turn. (39 dc)

Row 9: Ch 4 for button loop and sc in each st across. Turn. (39 sc)

Row 10: Dc in each st across. Turn. (39 dc)

Row 11: Sc in each st across. Turn. (39 sc)

Row 12: Dc in each st across. Turn. (39 dc)

Row 13: Ch 4 for button loop and sc in each st across. Finish off.

Weave in ends and attach buttons to left back opposite of button loops.


American Girl Basic DC Short Sleeve Top

This top is very simple and quick to make  It's top down, seamless, one piece construction means less ends to weave in. It's an adjusted version of my Journey Girl Basic DC Short Sleeve Top.

The following 18" dolls have tried this top on and approve: American Girl, Gotz, Our Generation, Madame Alexander, and Springfield.  It also fits a bit big, but wearable, on Journey Girl.


American Girl Basic DC Short Sleeve Top
Written pattern copyright Kimberly Saunders 2014
Please do not reprint or repost this pattern, but please do link to this page to share with others.
Do not sell or reproduce this written pattern. If you sell anything made from this pattern, please give credit to me for the design 
and include a link to either the free pattern or my blog. Thank you!


Supplies:
Worsted Weight Yarn 
Crochet hook size H (5mm)
3   3/8 -5/8" buttons for back closure

Gauge: 9dc = 2" and 5 rows = 2"

Special Stitches:
Starting Double Crochet: SDC = Pull chain to almost as high as a dc, yo and pull up a loop in the first stitch, yo and pull through one loop,  yo and pull through 2 loops.  
Click HERE for a photo tutorial.

Notes:
*The top is worked from the top down, turning after every row.
*Work all dc in row 1 in the back ridge of the loop for a more finished look at the neck edge.
*The first row is the right side.
*I don't put a starting dc at the beginning in the pattern for ease in reading and keeping track of the number of stitches.
*I use the Starting Double Crochet at the beginning of row. If you prefer another method, substitute it.

Top

Chain 37 + 4 for the button loop.

Row 1: Working in the back ridge of chain, dc in the 5th ch from hook and in next 4 chs, *3 dc in next ch, dc in next 7 chs, 3 dc in next ch, dc in next 9 chs, 3 dc in next ch, dc in next 7 chs , 3 dc in next ch, dc in next 5. Turn. (45 dc)

Row 2: Dc in next 6 sts, 3 dc in next st, dc in next 9 sts, 3 dc in next st, dc in next 11 sts, 3 dc in next st, dc in next 9 sts, 3 dc in next st, dc in next 6 sts. Turn. (53 dc)

Row 3: Dc in next 7 sts, 3 dc in next st, dc in next 11 sts, 3 dc in next st, dc in next 13 sts, 3 dc in next st, dc in next 11 sts, 3 dc in next st, dc in next 7 sts. Turn. (61 dc)

This next row will form the armholes.

Row 4: Dc in next 10 sts, skip 11 sts, dc in next 19 sts, skip 11 sts, dc in next 10 sts. Turn. (39 dc)

Row 5: Ch 4 for button loop, dc across. Turn. (39 dc)

Row 6-8: Dc across. Turn. (39 dc)

Row 9: Ch 4 for button loop, dc across. Turn. (39 dc)

At this point you can finish off or continue with row 10 for a bit of a lacy trim.

Row 10: With right side facing (sc, ch 1, dc) in every other st. Finish off.

Finishing:  Weave in ends. Attach buttons to left side, opposite of button loops.


Thursday, April 10, 2014

American Girl Basic SC Short Sleeved Top


I thought it would be easy converting the Journey Girl Basic SC Short Sleeved Top into American Girl size. I kept trying different things and it was becoming not as simple. I had forgotten to take into account that not only is AG a bit bigger, but her body shape is different, too. When I realized that I needed to change the ratios and not just make it bigger, it wasn't long before I had this figured out. 
The following 18" dolls have tried this top on and approve: American Girl, Gotz, Our Generation, Madame Alexander, and Springfield.  It also fits a bit big, but wearable, on Journey Girl.


American Girl Basic SC Short Sleeved Top
Written pattern copyright Kimberly Saunders 2014
Please do not reprint or repost this pattern, but please do link to this page to share with others.
Do not sell or reproduce this written pattern. If you sell anything made from this pattern, please give credit to me for the design 
and include a link to either the free pattern or my blog. Thank you!

Supplies:
Worsted Weight Yarn 
Crochet hook size H (5mm)
4  3/8 -5/8" button for back closure

Gauge:  8.5 sc = 2" and 12 rows = 2"

Notes:
*The top is worked from the top down, turning after every row.
*Work all sc in row 1 in the back ridge of the loop for a more finished look at the neck edge.
*The first row is the right side.
*I do not chain 1 at the beginnings of the rows. If you would like to, you can.
*For ease in putting on and taking off, there are four buttons down the back. It is possible to put on with only 2 buttons, but it takes a bit of wiggling. If you decide to do 2 buttons, join at the end of Row 12. Omit the remaining 2 button loops, continue turning and joining at the end of each row. There will be an extra stitch at the end of Row 21, just skip it, and join to first sc in row.


Top

Chain 37 + 4 for the button loop.

Row 1: Working in the back ridge of beginning chain, sc in the 5th ch from hook and in the next 36 chs. Turn. (37 sc)

Row 2: Sc in next 5 sts, 3 sc in next st, sc in next 7 sts, 3 sc in next st, sc in next 9 sts, 3 sc in next st, sc in next 7 sts, 3 sc in next st, sc in next 5 sts. Turn. (45 sc)

Row 3: Sc in next 6 sts, 3 sc in next st, sc in next 9 sts, 3 sc in next st, sc in next 11 sts, 3 sc in next st, sc in next 9 sts, 3 sc in next st, sc in next 6 sts. Turn. (53 sc)

Row 4: Sc in each st across. Turn. (53 sc)

Row 5: Sc in next 7 sts, 3 sc in next st, sc in next 11 sts, 3 sc in next st, sc in next 13 sts, 3 sc in next st, sc in next 11 sts, 3 sc in next st, sc in next 7 sts. Turn. (61 sc)

Row 6: Sc in next 8 sts, 3 sc in next st, sc in next 13 sts, 3 sc in next st, sc in next 15 sts, 3 sc in next st, sc in next 13 sts, 3 sc in next st, sc in next 8 sts. Turn. (69 sc)

Row 7: Ch 4 for button loop, Sc in each st across. Turn. (69 sc)

Row 8: Sc in next 9 sts, 3 sc in next st, sc in next 15 sts, 3 sc in next st, sc in next 17 sts, 3 sc in next st, sc in next 15 sts, 3 sc in next st, sc in next 9 sts. Turn. (77 sc)

Row 9: Sc in next 10 sts, *(sc, ch 1, dc) in next st, skip next st* repeat 9 times, sc in next 20 sts, *(sc, ch 1, dc) in next st, skip next st* repeat 9 times, sc in next 11 sts. Turn. 

This next row forms the armholes:

Row 10: Sc in next 11 scs, ch 1, skip the next 9 ch 1 spaces, sc in next 21 scs, ch 1, skip the next 9 ch 1 spaces, sc in next 11 scs. (43 sc and 2 ch)

Row 11: Sc in each st and ch across. Turn. (45 sc)

Row 12: Sc in each st across. Turn. (45 sc) 

Row 13: Ch 4 for button loop, Sc in each st across. Turn. (45 sc)

Row 14-18: Sc in each st across. Turn. (45 sc)

Row 19: Ch 4 for button loop, Sc in each st across. Turn. (45 sc)

Row 20: Sc in each st across. Turn. (45 sc) 

Row 21: *(Sc, ch 1, dc) in next st, skip next st* repeat across row, sc in last stitch. Finish off.

Finishing:  Weave in ends. Attach buttons to the left side opposite of the button loops.