
I thought it would be easy converting the Journey Girl Basic SC Short Sleeved Top into American Girl size. I kept trying different things and it was becoming not as simple. I had forgotten to take into account that not only is AG a bit bigger, but her body shape is different, too. When I realized that I needed to change the ratios and not just make it bigger, it wasn't long before I had this figured out.
The following 18" dolls have tried this top on and approve: American Girl, Gotz, Our Generation, Madame Alexander, and Springfield. It also fits a bit big, but wearable, on Journey Girl.

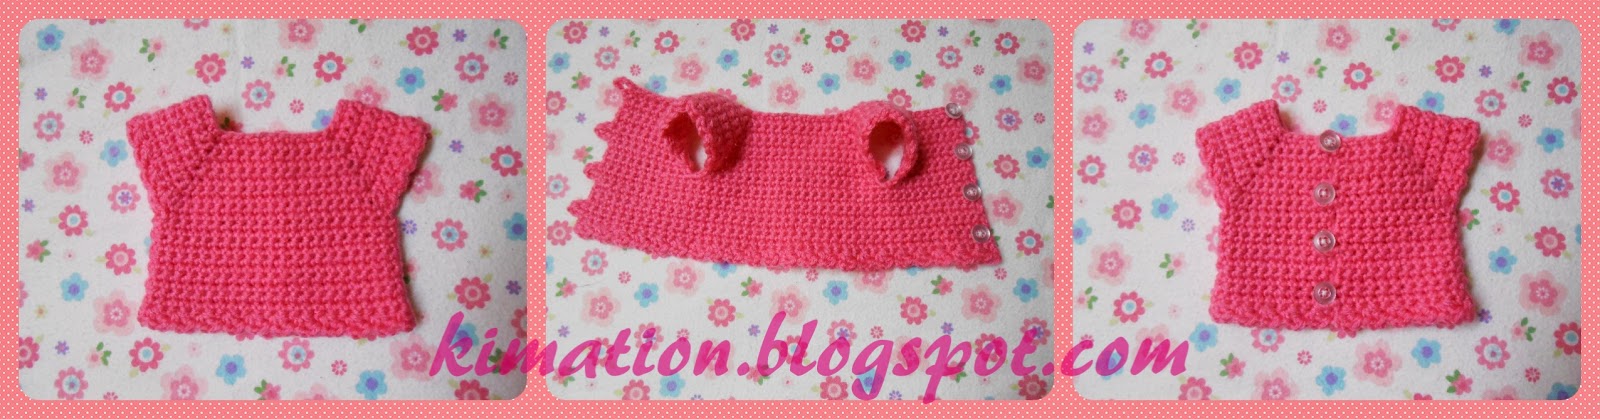
American Girl Basic SC Short Sleeved Top
Written pattern copyright Kimberly Saunders 2014
Please do not reprint or repost this pattern, but please do link to this page to share with others.
Do not sell or reproduce this written pattern. If you sell anything made from this pattern, please give credit to me for the design
and include a link to either the free pattern or my blog. Thank you!
Supplies:
Worsted Weight Yarn
Crochet hook size H (5mm)
4 3/8 -5/8" button for back closure
Gauge: 8.5 sc = 2" and 12 rows = 2"
Notes:
*The top is worked from the top down, turning after every row.
*Work all sc in row 1 in the back ridge of the loop for a more finished look at the neck edge.
*The first row is the right side.
*I do not chain 1 at the beginnings of the rows. If you would like to, you can.
*For ease in putting on and taking off, there are four buttons down the back. It is possible to put on with only 2 buttons, but it takes a bit of wiggling. If you decide to do 2 buttons, join at the end of Row 12. Omit the remaining 2 button loops, continue turning and joining at the end of each row. There will be an extra stitch at the end of Row 21, just skip it, and join to first sc in row.
Top
Chain 37 + 4 for the button loop.
Row 1: Working in the back ridge of beginning chain, sc in the 5th ch from hook and in the next 36 chs. Turn. (37 sc)
Row 2: Sc in next 5 sts, 3 sc in next st, sc in next 7 sts, 3 sc in next st, sc in next 9 sts, 3 sc in next st, sc in next 7 sts, 3 sc in next st, sc in next 5 sts. Turn. (45 sc)
Row 3: Sc in next 6 sts, 3 sc in next st, sc in next 9 sts, 3 sc in next st, sc in next 11 sts, 3 sc in next st, sc in next 9 sts, 3 sc in next st, sc in next 6 sts. Turn. (53 sc)
Row 4: Sc in each st across. Turn. (53 sc)
Row 5: Sc in next 7 sts, 3 sc in next st, sc in next 11 sts, 3 sc in next st, sc in next 13 sts, 3 sc in next st, sc in next 11 sts, 3 sc in next st, sc in next 7 sts. Turn. (61 sc)
Row 6: Sc in next 8 sts, 3 sc in next st, sc in next 13 sts, 3 sc in next st, sc in next 15 sts, 3 sc in next st, sc in next 13 sts, 3 sc in next st, sc in next 8 sts. Turn. (69 sc)
Row 7: Ch 4 for button loop, Sc in each st across. Turn. (69 sc)
Row 8: Sc in next 9 sts, 3 sc in next st, sc in next 15 sts, 3 sc in next st, sc in next 17 sts, 3 sc in next st, sc in next 15 sts, 3 sc in next st, sc in next 9 sts. Turn. (77 sc)
Row 9: Sc in next 10 sts, *(sc, ch 1, dc) in next st, skip next st* repeat 9 times, sc in next 20 sts, *(sc, ch 1, dc) in next st, skip next st* repeat 9 times, sc in next 11 sts. Turn.
This next row forms the armholes:
Row 10: Sc in next 11 scs, ch 1, skip the next 9 ch 1 spaces, sc in next 21 scs, ch 1, skip the next 9 ch 1 spaces, sc in next 11 scs. (43 sc and 2 ch)
Row 11: Sc in each st and ch across. Turn. (45 sc)
Row 12: Sc in each st across. Turn. (45 sc)
Row 13: Ch 4 for button loop, Sc in each st across. Turn. (45 sc)
Row 14-18: Sc in each st across. Turn. (45 sc)
Row 19: Ch 4 for button loop, Sc in each st across. Turn. (45 sc)
Row 20: Sc in each st across. Turn. (45 sc)
Row 21: *(Sc, ch 1, dc) in next st, skip next st* repeat across row, sc in last stitch. Finish off.
Finishing: Weave in ends. Attach buttons to the left side opposite of the button loops.

This top is so cute! I can't wait to try it! Thank you so much for the free pattern and all of the photos which will help greatly! ♥
ReplyDeleteYou're welcome! Hope you enjoy! :)
ReplyDeleteKimberly, can you tell me how long the top is from the front neck to the bottom? Also, the width between underarm "seams"? I could not match your length gauge but did on the width, so I adjusted by omitting 3 rows - with consideration for the button loops. I do not have a doll to try it on, so I'm depending on dimensions! (It is for my Granddaughter's American Girl doll. She lives more than 2000 miles away!)
ReplyDeleteAlso, I had difficulty with your Row 9 (I don't think omitting rows has any effect) and this is what I came up with to make it work:
Sc in next 10 sts, *(sc, ch1, dc) in next st, skip next st*, repeat 9 times, sc in next 18 sts, (sc, ch1, dc) in next st, *skip next st, (sc, ch1, dc) in next st*, repeat 8 times, sc in next 10 sts. Turn.
I also had difficulty with your Row 10 but it was probably because of my changes in Row 9. I can't understand my notes, otherwise I'd show it here! I did end up with 44 sc instead of 43, though.
Am I overlooking something or could there have possibly been a typo in your pattern instructions?
Thanks for all of your help! ~ Pam
I had the same problem with row 9. I figured out if I repeated the (sc, ch 1, DC) and skip st only EIGHT times (to equal 9 TOTAL) it works out perfectly. :) hope that helps :)
DeleteCenter front to bottom is about 4 3/8" long. A bit longer would be ok, too. It measures 5 1/2" across, so it's 11" from center back to center back.
ReplyDeleteI looked my top over and counted a few times, and my stitch counts are accurate. Row 10, you basically sc in each sc, including the first sc of the sleeve section, skipping the ch 1 and dc used in the sleeve openings. When I get the chance I will add a picture to better illustrate this.
I hope this helps. I will be updating the measurements into the pattern now, too. Thank you for the suggestion. I'll be doing it to my other doll patterns soon also. If you have any more questions just ask. :)
YIKES! My dimensions are perfect across (well, in total they are, but only 5" between underarms) but I am coming up with only 3-3/4" long! If i didn't omit any rows, It would have been almost enough! Oh well, I can just add some ruffles at the bottom, I guess, 2 of the sc I omitted were above the armpit line, so I hope the sleeve openings won't be too narrow. Silly me, I already sewed in all my ends, etc, without waiting for your answer!
ReplyDeleteI gotta git me one of them there American Dolls so I can try the garments on her before sending to my Granddaughter!! Maybe SHE should get ME one for MY birthday instead of the other way around!! lol!
Well, thank you for getting back to me so quickly and for all of your help! It is such a cute top and really so easy to make! ♥
I have the same issue with making clothes for my granddaughters Samantha doll!
DeleteI also had problems with row nine. I added up the stitches and it comes to 81. The prvious row totals 77. I'm confused.
ReplyDeleteI had the same problem with row 9. I figured out if I repeated the (sc, ch 1, DC) and skip st only EIGHT times (to equal 9 TOTAL) it works out perfectly. :) hope that helps :)
DeleteThis is an excellent pattern!! Thank you!!!!
ReplyDeleteAll this time I've been fudging it just to get on to the next row. Thank you for the correction.
ReplyDeleteThanks so much for this sweet pattern that comes together really quickly. I had some hitches but managed to get through okay. I'm not experienced so that hitches were my own problem. I appreciate you sharing.
ReplyDeleteNo matter what size hook I can't get the row gauge. Will just have to try it on the doll as I go. Made 8 squares with different hooks and yarns stitch gauge is perfect but row gauge up to a half inch off. The pattern is adorable though and I will figure out a way to make it work.
ReplyDelete